From:
http://www.mopedarmy.com/wiki/Honda_Express_RepairHonda Express Repair
Contents 1 Forward
2 Fuel System
3 Oil
4 Transmission
5 Electrical
6 Final Checks
7 First Start
8 Final Running Adjustments
9 FAQ
10 Important Year Differences
How to get a garage sale Express running, rev 2.1
See also:
Fred's GuideForwardI have a green ‘78 Express, I know what a pain they can be. So you wanna get yours to run? Or perhaps it runs now, but not as well as you would like? Have fun… Well, I will assume that the bike doesn't run at this point and tell you everything you need to do to get it going.
A few pointers:
You will need a few different sized screwdrivers, sockets and open end wrenches. Essential sizes are 10mm, 12mm, and 14mm.
Some containers for screws and parts is also a must.
Stuff like WD40 and a good spray carb cleaner will make everything easier.
Some paper and pencil for notes and such is also a good idea.
If you can spare the money, the Clymer guide to the Honda Express is a very useful thing to have.
If you know someone with a plethora of tools, it would be best to try and sucker them into letting you work on the bike there. Having good tools makes a big difference.
Ready? hang on…
Fuel SystemFirst, make sure the petcock works by disconnecting the hose from the carburetor and sticking the hose in a container. Then turn the petcock to on and reserve. If gas comes out, then keep moving on.
If not, unscrew the petcock from the gas tank and clean out the filter. The filter will probably get stuck in the tank, so get it out somehow. Keep in mind that you should drain the gas tank before doing these last few things… Anyway, put the filter and the petcock back in, and see if fuel’s going through. If not, get a petcock from another bike. One from Honda is gonna cost a fortune. I know, I checked.
If you’re getting plenty of fuel, then pull apart the carb. Clean out the bowl. Clean out the passage that the float needle seals off. Clean out the main jet (the thing that sticks out into the carb bowl from the top section) with something long and thin, but hopefully not sharp. I have used a little bit of thin wire, but its not the best idea. Use a ton of strong carb cleaner on everything (except the float itself).
Unscrew both adjustment screws (but first screw them in all the way, counting how many turns it took so you can put them back the same) and clean out the screw passages with strong carb cleaner and such. Maybe soak the whole carb in a bit of cleaner.
Look at the little pin on the end of the throttle cable. Take it out (carefully). A C-Clip holds its position on the end of the cable. The clip can sit in any of the 5 grooves. Put the C-Clip in the middle one. Now put it back together.
Pull apart the air filter holder. The filter is the spongy thing. It’s probably falling apart. Just pull it out of there for now if it is. Otherwise clean it out and soak it in light oil. Then squeeze some of the oil out and stick it back in the canister. Leave the filter box off for now. Put everything back together and put it back on the bike.
Screw the AIR MIXTURE SCREW ( the lower of the 2 adjustment screws ) all the way in, then turn it out 2 and 1/8th turns. Now turn the THROTTLE STOP SCREW (the top of the 2 adjuster screws) all the way in, and then out about 1 and a half turns. This will need to be changed after the bike is running. Just leave it for now. Remember where they were before you took the carb apart? I hope so, because you may need to set them back to where they were if the bike runs poorly.
OilNow look in the oil tank. Is there oil in it? If it's low, fill it with Honda two stroke injector oil, or something like it. I use the real Honda stuff and find it leaves far less of a carbon buildup then the cheap stuff at gas stations.
Now follow the oil line down to the oil pump. Is the line full of oil? Can you see air bubbles in it? If there are bubbles in it, unscrew the little screw on top of the injector and let the oil drain through until you can’t see any more bubbles, then replace the screw. Check the line leading out from the injector. Does it have bubbles in it? 1 or 2 tiny bubbles are okay, but if it has large gaps in it you will have to remove the hose and fill it up with oil, then stick it back on without loosing much. This sounds harder then it is. There are other ways, but I just do this and it works fine.
TransmissionLook at the front of the transmission. There should be a big bolt that holds a plate in place. With a pan beneath the front of the transmission, remove this bolt. The transmission oil level should be slightly below the opening. If you put a (clean) finger into the hole you should feel oil. If you cannot, you need to add more.
If the bike has many miles on it or has come from a questionable source, it is best to drain the transmission and then fill it with fresh oil. To do so, remove the front nut, then place a pan beneath the middle of the tranny. Find the one bolt along the bottom and remove it. Oil should now run from the hole. Leave it sit for some time (and tip the bike so that more runs out if possible) before putting the bolt back in. Now use a funnel to pour in roughly 0.8 quart of SAE 30 motor oil. Then put the bolt and plate back in place (the plate holds the carb overflow tube).
ElectricalTake off the bike’s seat. It's held on by an odd wingnut under the front of the seat.
Check out the wires under there. Make sure they are all connected tightly.
Check the battery. Is it leaking? if so replace it.
Are any of the fluids low? If so refill them.
Is it really old and grungy and disgusting and all that? If so replace it.
After that, hook just the battery to a SIX VOLT battery charger, and let it sit overnight. If you don't have a charger, then put it back in the bike and don't worry too much about it right now.
Check the fuse in the little casing. If it is blown, replace it. once all this has been done, put the seat back on.
The 1977 and 1979-1980 express used one type of battery. The 1978 used a different type. The 1981+ used a third larger type. Make sure to get the right one for your bike should you need a new one.
Pull out the spark plug. Clean it off. Set the gap to about 0.026 inches(about 0.65 MM). Now connect the plug to the plug cable, and rest the very end of the plug on the head of the engine. Try cranking over the motor a time or two. Is there a nice blueish yellowish spark from the plug? If so keep going, if not you either have a bad cable, bad coil or bad points. It would be a good idea to put in a new plug if the one you have is worn or the wrong type.
The 1977 uses an NGK BP6HS.
The 1978 and later uses an NGK BP5HS.
The UK 1978 and later uses an NGK BPR4HS.
Pull the timing cover off (the round shiny metal cover on the right hand side of the motor with HONDA written on it). turn the flywheel until you can see the points (the two metal “Fingers” that open and close as the flywheel turns. Do they look corroded? rusty? Are the surfaces worn and uneven? If so the flywheel needs to come off and the points need to be replaced.
If they look fine, they may still be set wrong, but the engine SHOULD still start, assuming they aren't badly off.
Final ChecksBefore starting, check the following.
Do both brakes work? Will they both hold the bike in place with your weight on a down hill? If not, they will need to be either adjusted or replaced. See the FAQ below for more details.
Is there air in the tires? If not, fill the front to 21 PSI and the rear to 28. If they do not hold air, the innertube will need to be replaced.
Is everything tight? Go around the bike making sure all screws, nuts and bolts are tightened down. Don't want that gas tank falling off half way down the road…
Do all the cables work? Brake, throttle, choke? If not, they will need to be replaced.
If you have or can borrow a compression gauge, Stick it in the spark plug hole and crank the motor over a few times. Do this with the throttle held all the way open. The gauge should read somewhere between 70 and 120 PSI. Any lower and the bike’s not gonna run. Much higher and you probably need to do some decarbonizing. If it is lower then 70 then you probably have very worn piston rings or a bad head gasket.
First StartNow that all this has been covered, make sure everything is back together (except the air filter box).
Make sure the bike is on the center stand, and that the back wheel is off the ground.
Put fresh gas in the gas tank. Leave the gas cap off for now. (remember to put it back on with the knob set to “Vent” before riding)
Turn on the petcock. Set it to run (or reserve if it was the only position it worked in).
Turn the key on.
Turn the red kill switch to run.
Pull the choke all the way on and hold it on.
Wind up the starter spring.
Pull the back brake, releasing it quickly
Repeat 10 times if bike does not start.
If bike does not start, keep reading. If bike DOES start, skip to the next section.
Try starting it as outlined above. This time try it with the throttle held open part way, or all the way
Try starting it with the choke turned off
Try starting it with your hand mostly over the air intake on the carb.
Try other combinations of the above.
If this STILL doesn't work even after trying each method, and you are on or near a hill, then put the gas cap and air box on, wind up the bike, hold the choke on, and roll down the hill. Part way down, turn the throttle part way open, pull the back brake and quickly release it. If the bike fires up and runs, hold the throttle open and keep going, DO NOT STOP! Do not let it idle. Keep riding like this for about 30 seconds, then turn the choke off. keep riding it a few minutes till its warmed up and then go to the next section.
Final Running AdjustmentsOnce the bike is running and warmed up, park it on the center stand (with the air box on) and slowly adjust the THROTTLE STOP SCREW (the upper one). Turn it out to slow down the idle. Turn it in to speed up the idle. If the bike dies as soon as or shortly after you release the throttle, then increase the idle. If the wheel turns more then very slowly when the bike idles, then lower the idle. Turn it in slow amounts and then rev up the engine for a few seconds, then let it drop back to an idle. If all goes well you now have a running bike.
You can also try adjusting the IDLE MIXTURE SCREW if your bike still won't idle well. Turning it in makes the idle mix richer (more gas) which is better for cold starting and idling with the engine cold. Turning it in too much though will also cause problems. Turning it out will result in a leaner mix. This gives a better warm idle and can solve problems of bogging down when accelerating from a dead stop. 2 and 1/8th turns is simply what my bike runs well with.
If you have access to a timing light, You should check your timing. There are different kinds of light, but on mine you hook the power connection to any 12 volt battery (keep in mind your bike has a 6 volt battery), then fasten the sensor around the spark plug cable. After that. you take the timing cover off, start the bike and aim the light towards the timing marks on the engine case. Each time the engine fires the light flashes on. When aimed at the timing marks in a somewhat dark room/area, you should be able to see the F marker on the flywheel lining up with the mark near the front of the crankcase. Keep in mind that F stands for Fire and T means Top Dead Center (the point at which the piston as at the very top of its upward travel). You need to set the timing with F, NOT T!! If the F mark does not line up closely with the marker, you will need to set the timing closer. I wont go into detail right now on that.
FAQ Help! My bike starts but then blows the headlight/tail light!
If this happens its cause you are running with a dead/no battery. Read the section on the battery near the top of this guide. When I press on the starter pedal (pre 1981 model) it doesn't seem to do anything, pulling the brake handle doesn't turn the engine.
The wind up spring has very likely snapped. While you can get a replacement spring, it’s best to replace the entire transmission cover which contains the spring. If you are considering trying to just replace the spring, keep in mind it requires special equipment and contains great potential for personal injury/death. I can wind the spring just fine, but squeezing the brake handle doesn't do anything!
Follow the brake cable down to above the tranny. There is a nut around the line which you can tighten/loosen to change how far you have to squeeze the brake handle to start the engine. The bike starts and runs, but seems to stop accelerating around 25 MPH. The engine’s sound changes as it reaches its max speed.
If this is the case you very likely have a clogged muffler. Remove the 4 screws/nuts that hold the muffler in place and take a good look at the exhaust port. If it seems clogged with oily black carbon, carefully scrape it clean. As for the muffler, you have a few options. The easiest is probably to put the entire muffler in a fire for a few hours to burn off the oil. After that you can shake the dried flaky carbon out. If this doesn't work you may consider some sort of solvent. If you go this way though make sure it is flushed out before putting the muffler back on the bike! See also: Cleaning the muffler The bike is nearly impossible to start, it takes a very long time and even once it does start will not idle very well until it is warm.
Try turning the idle mixture screw in slightly. 1/8th-1/4th turn. The bike starts and idles, but bogs down/dies as soon as it’s given gas, especially when warm.
Try turning the idle mixture screw out slightly. 1/8th-1/4th turn. My high mileage bike starts and runs well, but has very poor power and acceleration despite the engine running at high speeds.
You probably have a worn clutch or far too thick of an oil in the tranny. Start by replacing the tranny oil as detailed above. If even after this the problem hasn't gotten better, then its time to tear apart the transmission and replace the clutch. It is rather involved so I won't detail it here. The Clymer service manual would be helpful. My bike runs fine and goes like a bat outta hell, but I can't stop!
If you have rather weak brake power, then you can start by adjusting them. At the end of the back brake line is a finger screw. Try screwing it in until you have better braking power. The front brakes are adjusted the same way. If they are already adjusted as far as they will go, then you will need to replace the brake shoes. Once again, the Clymer manual gives good instructions. If one of the cables has broken, they can be bought for cheap and installed simply enough. I cleaned the carb out, but after turning the petcock on, gas just starts running out the overflow drain!
Take apart the carb again and check to make sure the float is still floating (as detailed above). If not, replace it. If it is, then try a new float needle. I want to replace my points/do something behind the flywheel, but I cant get the flywheel off!!
You have two options here. One is to find the Honda flywheel holder (or something similar) to go in the openings in the flywheel. This holds it in place so you can turn the nut. The other option is to use an Air Impact Driver to remove the nut. This works very well and takes almost no time or effort. If I let my Express sit for a week or two, it runs poorly for the first half an hour or so, and produces more blue smoke then normal.
My Express does this. It seems that the oil injector has become worn enough that oil leaks through it and into the crank case. I have yet to work up the money for a new injector, so I don't know if this will fix the problem or not. The easiest solution is to just ride more! :) My air filter has turned to mush, where can I get a new one?
Any small engine or motorcycle shop should be able to find you a generic sponge filter element that fits. My bike ran fine when I first did the above steps, but now it will only run for a few minutes!
Check that your gas cap’s vent is not clogged. If the bike runs fine without the gas cap then you can try cleaning the cap with some carb cleaner or just about anything. Also make sure the knob on top is turned to Vent. My 1982 bike stops accelerating at 25 MPH. I already did everything in your guide though!
There was a version of the later Express released only in Iowa. This bike had a restrictor that prevented it from going faster. The model number is NC50I instead of NC50. I don't know what all is involved in turning it into a full speed express.
Fine, You’re so smart, how do I set my timing?
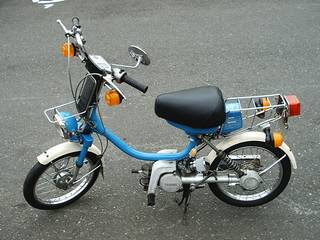
The Express doesn't exactly have adjustable timing. You can however loosen the timing plate and turn it ever so slightly to increase/decrease the point gap. This effectively retards/advances the timing. If the points will no longer close completely after turning the plate far enough though, then you will need to replace the points. Important Year DifferencesThe 1981+ express had many changes. They added turn signals, an electronic ignition, a kick starter, larger brakes/clutch, an automatic choke, etc etc etc. The later bikes even had a 2 speed transmission. Keep this in mind when ordering parts. If you need a part, be sure it is for the year of bike you have.
Notes for 1981+ owners:If your turn signals fail to blink, make sure ALL the bulbs are installed and good. One burnt out bulb will prevent them all from working right. If this doesn't fix it, the flasher under the seat may need to be replaced.
Because of the electronic ignition, you do not need to set your timing.
If you take apart your carburetor, it is important not to open the automatic choke box!
The lines from the carb to the automatic choke and such can crack and leak. If this happens you will have a hard time starting and idling. They are easy to replace.
The transmission cover is held on by bolts instead of screws. the drain bolt is different from the rest.