A major part of my solar project is to provide emergency lighting for when the power goes out. It doesn't happen very often. Unfortunately, every time the commercial AC goes away (due to storms, etc.), my flashlights are all somewhere else - usually somewhere that would require a flashlight in order to find them.
My thinking was that it would be awesome if I could simply have a couple of strategically placed DC lights that hooked into the solar controller batteries. It would be even better if they would just magically come on when the power went off. Sounds simple, right? Well, I thought so, too. Since I've been enjoying the Arduino stuff so much, and it would be cool to actually make something useful with one, I thought this would be an ideal project.
So off I went to ask my pal Google what it takes to monitor the AC. Google was somewhat helpful, but it looked like everything that had been built was relying on relays, opto-isolation circuits, a used space shuttle, or some other gizmo that wasn't in my junk drawer. I found one interesting thread that talked about using a wall wart, which felt right to me, but I didn't have anything suitable there either.
Then I plugged in my cell phone to charge it up...
There it was! I had a nice regulated 5v (presumably) power source that connected right into the AC. The Fluke quickly revealed it to be a 5.07vDC source (close enough). You should check yours before you hook it up, too, by the way.
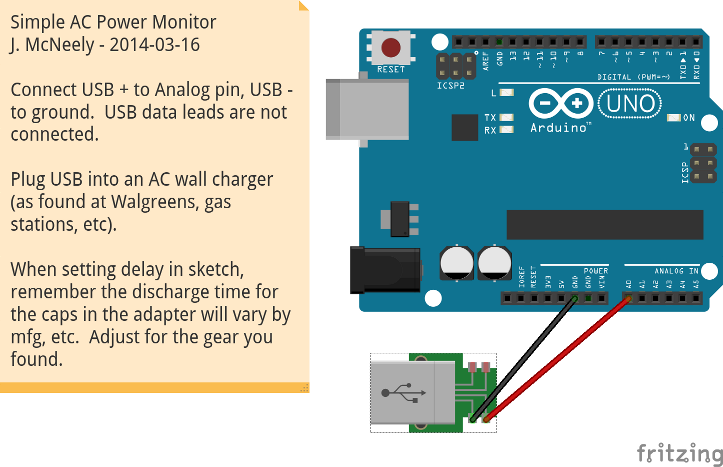
So I stripped a USB cable (lots of extras around here), hooked the ground into the Arduino, hooked the positive power lead into an analog pin, and started playing around. Eventually, I ended up with a monitor that has LEDs for status and a really loud buzzer. I've stripped away all but the essentials for you guys so that you can build whatever you like into yours.
Here's how it looks:
... and here's a basic sketch:
To test it, just plug the USB charger into a power strip and open the serial monitor in the IDE. Switch off the power strip, and wait for the delay, then you'll see the power failure message in the serial monitor. Turn the power strip back on, and you'll see the restored message. Simple, eh?
Happy Hacking!
Joe
My thinking was that it would be awesome if I could simply have a couple of strategically placed DC lights that hooked into the solar controller batteries. It would be even better if they would just magically come on when the power went off. Sounds simple, right? Well, I thought so, too. Since I've been enjoying the Arduino stuff so much, and it would be cool to actually make something useful with one, I thought this would be an ideal project.
So off I went to ask my pal Google what it takes to monitor the AC. Google was somewhat helpful, but it looked like everything that had been built was relying on relays, opto-isolation circuits, a used space shuttle, or some other gizmo that wasn't in my junk drawer. I found one interesting thread that talked about using a wall wart, which felt right to me, but I didn't have anything suitable there either.
Then I plugged in my cell phone to charge it up...
There it was! I had a nice regulated 5v (presumably) power source that connected right into the AC. The Fluke quickly revealed it to be a 5.07vDC source (close enough). You should check yours before you hook it up, too, by the way.
So I stripped a USB cable (lots of extras around here), hooked the ground into the Arduino, hooked the positive power lead into an analog pin, and started playing around. Eventually, I ended up with a monitor that has LEDs for status and a really loud buzzer. I've stripped away all but the essentials for you guys so that you can build whatever you like into yours.
Here's how it looks:
... and here's a basic sketch:
/*
  Simple AC Power Monitor
  J. McNeely
  2014-03-16

  This sketch allows a cheap and simple way of detecting an AC power
  failure.  I looked all over for a simple way to do this, and found
  that this is very inexpensive, and appears to be quite accurate.

  In order for this idea to work, the Arduino must be powered by
  batteries or alternative sources (mine is the solar gear).

  This sketch is just a basic starter setup to be incorporated into
  whatever larger project you have in mind.

  Best of Luck!
  Joe

*/

#define ALARMPIN 2
#define POWERSENSEPIN A1

float  voltage = 5;
float  voltageThreshold = 4.5;

float  powerVal = 1023;
float  powerValPrv = powerVal;
int    powerState = 1;
int    powerStatePrv = powerState;
long   lastPowerDebounceTime = 0;
long   debouncePowerDelay = 5000;  // Delay before power status is considered to have changed.
int    alarmState = LOW;
int    alarmFlag = 0;


void setup() {
  pinMode(POWERSENSEPIN, INPUT_PULLUP);
  pinMode(ALARMPIN, OUTPUT);
  powerVal = analogRead(POWERSENSEPIN);
  voltage = powerVal * (5.0 / 1023.0);
  if (voltage > voltageThreshold) {
    powerState = 1;
    alarmState = HIGH;
    powerValPrv = powerVal;
  } else {
    powerState = 0;
    alarmState = LOW;
    powerValPrv = powerVal;
  }
  digitalWrite(ALARMPIN, alarmState)
  Serial.begin(9600);
  Serial.println("Commercial Power Monitor");
  Serial.println("------------------------");
  Serial.println();
}

void loop()
{
  if ((millis() - lastPowerDebounceTime) > debouncePowerDelay) {
    powerVal = analogRead(POWERSENSEPIN);
    voltage = powerVal * (5 / 1023.0);
    if (voltage > voltageThreshold) {
      powerState = 1;
      setAlarm(0);
    } else {
      powerState = 0;
      setAlarm(1);
    }
  }

  if (powerState != powerStatePrv) {
    lastPowerDebounceTime = millis();
    setPowerChange();
  }
}

void setPowerChange() {
  // This is a stub.  More complex actions may be hooked into this function.
  powerStatePrv = powerState;
  Serial.print("\nCommercial Power Changed: ");
  if (powerState == 1) {
    Serial.println("Power Restored");
  } else if (powerState == 0) {
    Serial.println("Power Failure");
  }
}

void setAlarm(int alarmAction) {
  // This is a stub.  The ALARMPIN could be connected to an LED, buzzer, relay, whatever.
  if (alarmAction == 0) {
    alarmFlag = 0;
    alarmState = LOW;
    digitalWrite(ALARMPIN,alarmState);
  } else if (alarmAction == 1) {
    alarmFlag = 1;
    alarmState = HIGH;
    digitalWrite(ALARMPIN,alarmState);
  }
}
To test it, just plug the USB charger into a power strip and open the serial monitor in the IDE. Switch off the power strip, and wait for the delay, then you'll see the power failure message in the serial monitor. Turn the power strip back on, and you'll see the restored message. Simple, eh?
Happy Hacking!
Joe